Overview
The flowers we drew in Week 1 have come to life and taken over UNSW! We must eradicate them before the entire campus becomes Village Green (we don’t want that). You pick up your trusty giant scissors and head towards the root of the problem. But little did you know, that the flowers aren’t going to stand by idly, basking in the sun all day.
CS Flower is an action packed turn-based game where you the player, move across the Physics Lawn and cut down all the flowers. However, it's not as easy as it sounds. While you snip away at each of them one by one, the flowers wake up, evolve and retaliate against you. So it is up to you to figure out the best angle of attack against these formidable foes!
Assignment Structure
This assignment will test your ability to create, use and manipulate 2D arrays and structs to solve problems. This will be done through the in-game map that has been implemented as a 2D array of tiles. Each of these tiles are represented by a struct tile, which is outlined below:
struct tile
-
Purpose:
- To store information about the tiles of the map.
-
Contains:
-
enum tile_type type
- The type of the map tile.
- All tile types are found in the enum tile_type definition.
-
struct flower flower
- Represents the enemy flower at this location (if one exists).
-
enum tile_type type
struct flower
-
Purpose:
- To store information about a particular enemy flower.
-
Contains:
-
enum flower_state state
- Represents the state that the enemy flower is in.
-
enum flower_state state
The provided enums are quite extensive. Definitions of each are provided below:
enum tile_type
-
Purpose:
- Represent the possible types of a tile.
-
Possible values:
-
EMPTY
- Represents an empty space.
-
BUSH
- A wall that blocks the movement of the player and enemies.
-
BRANCH
- An interactable object that will create sound when stepped on by the player.
-
DANGER
- A tile that indicates a root will erupt soon.
-
ROOT
- A wall that the enemy can place down.
-
POLLEN
- A tile that kills the player, which the enemy can place down.
-
SEEDLING
- A baby flower that can grow.
-
FLOWER
- An enemy flower.
-
EMPTY
enum flower_state
-
Purpose:
- Represents the state that the flower is in.
-
Possible values:
- NONE
- DORMANT
- DISTURBED
- AWAKENED
- ANXIOUS
- ENERGETIC
Game Structure
There are two main phases to the overall game:
Setup Phase
This phase takes care of the initial setup of the map and the game. The setup is as follows:
- The player is spawned onto the map
- Various tiles known as foliage are placed onto the map
- The flowers which act as enemies are spawned onto the map
Gameplay Phase
This phase handles the gameplay, which is split into turns. On each turn, the player, flowers, and the game will manipulate the map. A turn is comprised of the following steps:
-
The Player Step
- The player is allowed to make an action like moving around or cutting a flower
-
The Upkeep Step
- The upkeep is an intermediary step where you update parts of the map and its tiles
-
The Flower Step
- The flowers are all allowed to make an action like attacking or defending against the player
-
The End Step
- The final step at the end of a turn in which you determine if the game should end or continue
As you progress through each stage of this assignment, you will be implementing parts of each step.
How To Get Started
In order to get started with CS Flowers, do the following:
- Create a new folder for your assignment work and move into it.
- Download the starter code (cs_flowers.c) here or, copy this code to your CSE account using the following command
- Run 1511 autotest cs_flowers to make sure you have correctly downloaded the file.
-
Read through Stage 1.
-
Spend a few minutes playing with the reference solution -- get a feel for how the assignment works.
1511 cs_flowers -
Think about your solution, draw some diagrams, write some pseudocode to help you get started.
- Start coding!
Reference Solution
To help you understand the proper behaviour of the game, we have provided a reference implementation. If you have any questions about the behaviour of your assignment, you can check by trying it in the reference implementation.
To run the reference implementation, use the following command:
1511 cs_flowersAbout the Starter Code
The provided starter code has done some setup for you. This is explained below.
Before the main function, the starter code has:
- Imported the standard input/output library.
- Defined some initial #define's and enums.
- Defined the struct(s) described above.
In the main function, the starter code:
- Creates a 2D array of struct tiles called map.
- Initialises this map with some default values.
- Prompts you to write your own code!
Your Tasks
This assignment consists of four stages. Each stage builds on the work of the previous stage, and each stage has a higher complexity than its predecessor. You should complete the stages in order.
A video explanation to help you get started with the assignment can here found here:
Stage 1
Stage 1.1 - Spawn player
To ease you into this assignment, your first task is to spawn the player onto the map! Currently, the provided starter code creates a 2D array of struct tiles and initialises them with the initialise_map() function that is included.
Your program will need to scan in the player's starting position. This will be given as a pair of integers which denotes the row and column (in that order). You will need to then use the provided print_map() function to print the map with the player.
dcc cs_flowers.c -o cs_flowers./cs_flowersWelcome to CS Flowers! Player's starting position:[row] [col]Unsure how to call the print_map() function? Here is an example that you can copy to your main function.print_map(map, 5, 7);Notice how we only need to provide the map variable, no square brackets are required!This will print your current map with the player spawning at (5, 7). How could you modify this to use the position that you scanned in?
Here is a diagram of the map where the player is spawned at (5, 7). The player is represented on the map as P.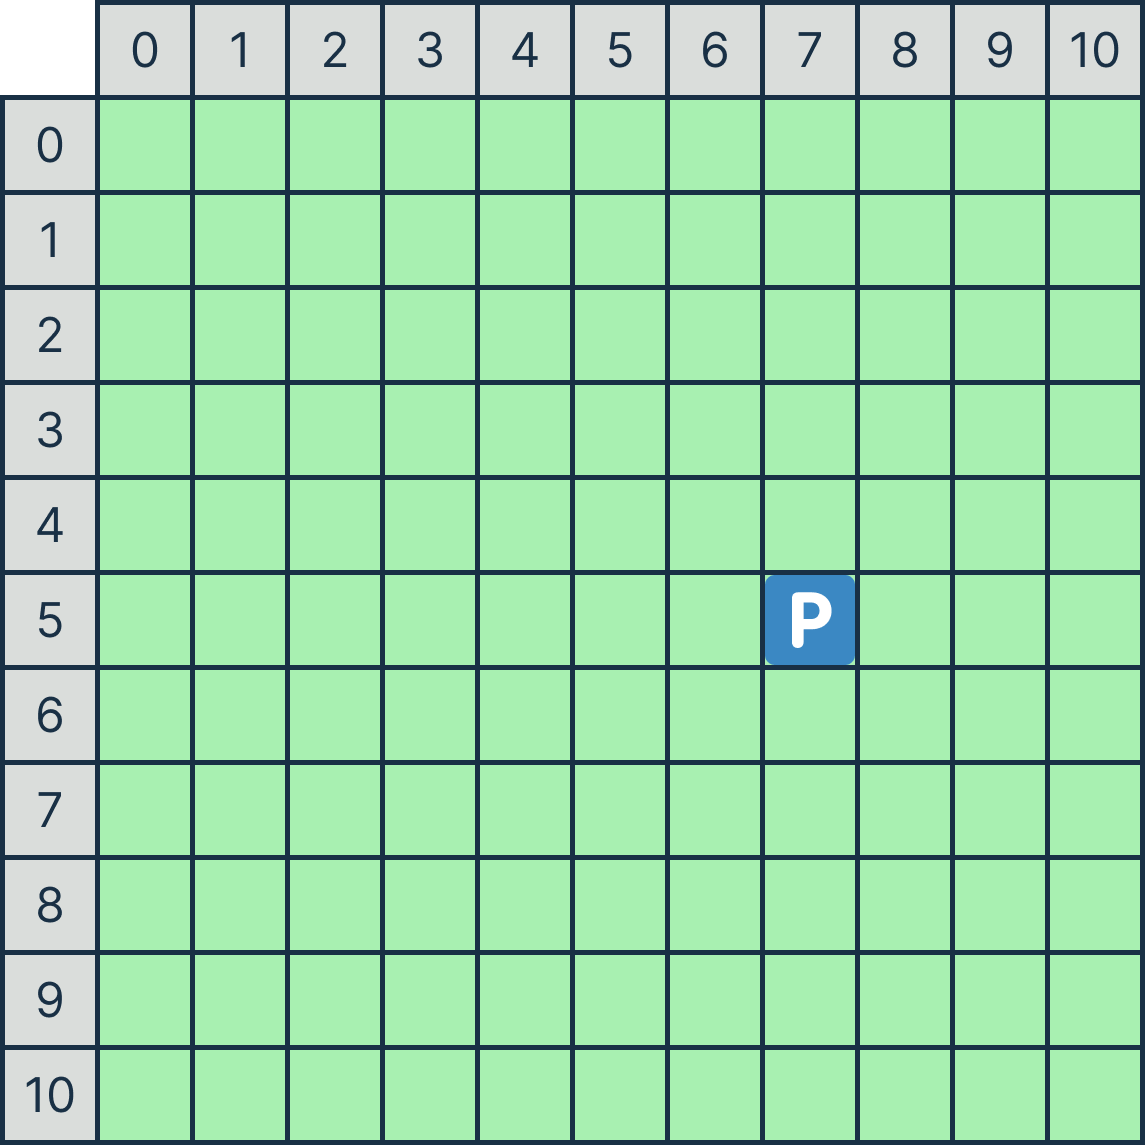
Assumptions / Restrictions / Clarifications
- The row/column input will always be integer values.
- The row/column provided will fall within the map boundaries.
Examples
Autotest
You may like to autotest this section with the following command:1511 autotest-stage 01_01 cs_flowersRemember to do your own testing!
Stage 1.2 - Validate Player Spawn
Now that you got the player onto the map, lets restrict where they could spawn at. It would make more sense if they start from the edge of the map, so now the player's starting position will need to be error checked so that it is within the spawn boundary.
The span boundary are the edge tiles of the map i.e., tiles whose row must either be 0 or MAX_ROW - 1 or col must either be 0 or MAX_COL - 1.Remember that array indicies start at 0.
Here is a diagram with the spawn boundary highlighted in blue.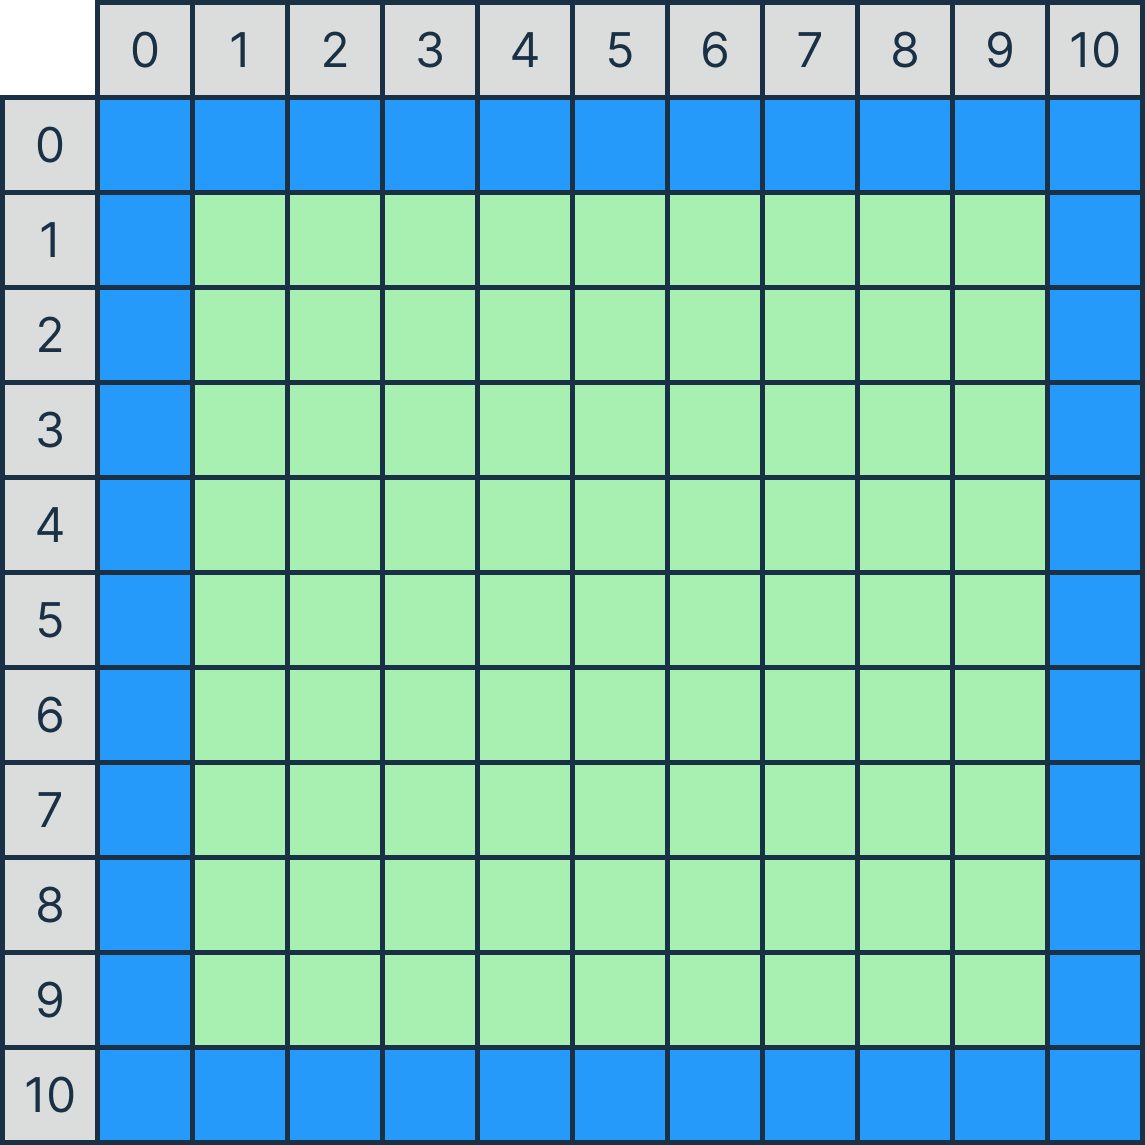
If the starting position does not place the player within the boundary, the program should print out Invalid starting position!. Then the program should prompt with Re-enter starting position: and re-scan the position of the player, repeating until a valid position is scanned in.
Welcome to CS Flowers! Player's starting position:[row] [col]Invalid starting position! Re-enter starting position:[row] [col]... Invalid starting position! Re-enter starting position:[row] [col]You will need to use a while loop to check if the position is within bounds and re-scanning if it isn't.Assumptions / Restrictions / Clarifications
- The row and column input will always be integer values.
- A valid position will eventually be scanned in.
Examples
Autotest
You may like to autotest this section with the following command:1511 autotest-stage 01_02 cs_flowersRemember to do your own testing!
Stage 1.3 - Add Branch
At this point, it's obvious that Australian weather is a coinflip, coincidentally it was windy earlier and as a result, Physics lawn has been littered with various foliage. After spawning the player, the program should prompt for how many tiles of foliage will be added onto the map.
How many tiles of foliage:[count]The first type of foliage you will be adding to the map are branches. Branches are 1 x 1 tiles, and are passed in via the following input. The row/col values are the position of the branch on the map. A successful addition will print Branch added!.
How many tiles of foliage:[count]b [row] [col]Branch added!b [row] [col]Branch added!b [row] [col]Branch added! ...After all foliage has been added you will need to then use the provided print_map() function to print the map with the foliage.
You will need to modify the 2D array, map, to add in the foliage. For branches, you will need to change the tile type from EMPTY to BRANCH.Now would be a good time to make use of functions. You can move adding foliage onto the map into its own function.It is highly recommended that you approach tackling this substage and subsequent stages onwards with the use of functions.
This will ensure that complex problems are easier to code up (logic) and can reduce overdeep nesting (style).
Here is a diagram of a branch being added at (3, 4). Branches are represented on the map as _/-.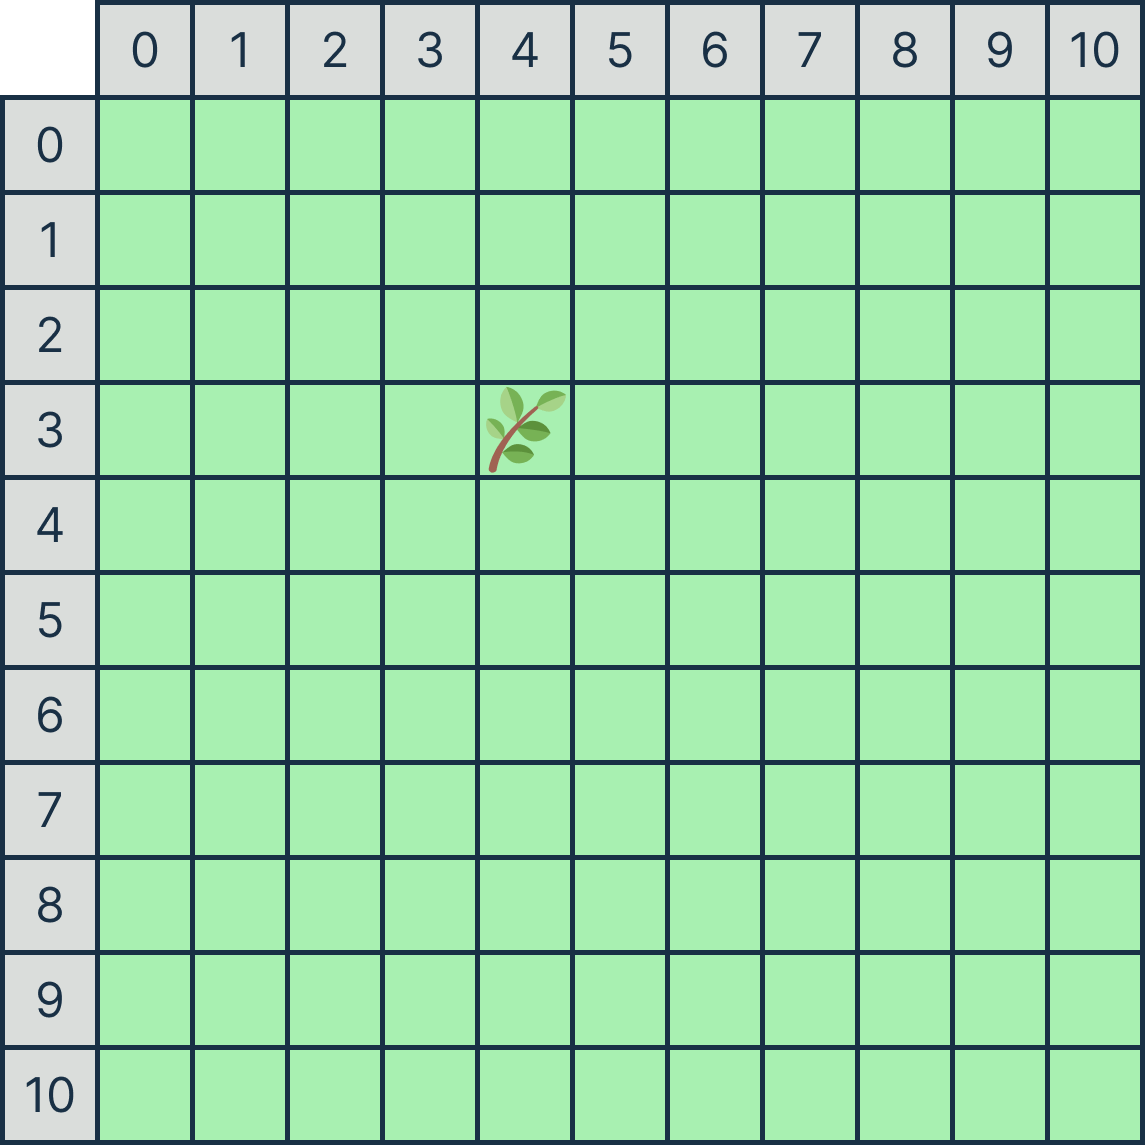
Error Handling
Like with Stage 1.2, foliage must be added within a predetermined boundary which are all the non-edge tiles of the map. If the position of the foliage lies outside, then that addition will be skipped (not added) and the program should print out Invalid foliage position!.
The foliage spawn boundary are the non-edge tiles of the map, i.e., tiles whose row/col are between 1 and MAX_ROW - 2/MAX_COLUMN - 2.To ensure correct input handling, you might want to include a space before the %c specifier in the scanf function for reading characters to help clear any preceding whitespace characters or newline characters left in the input buffer from previous inputs.
Here is a diagram with the spawn boundary highlighted in blue.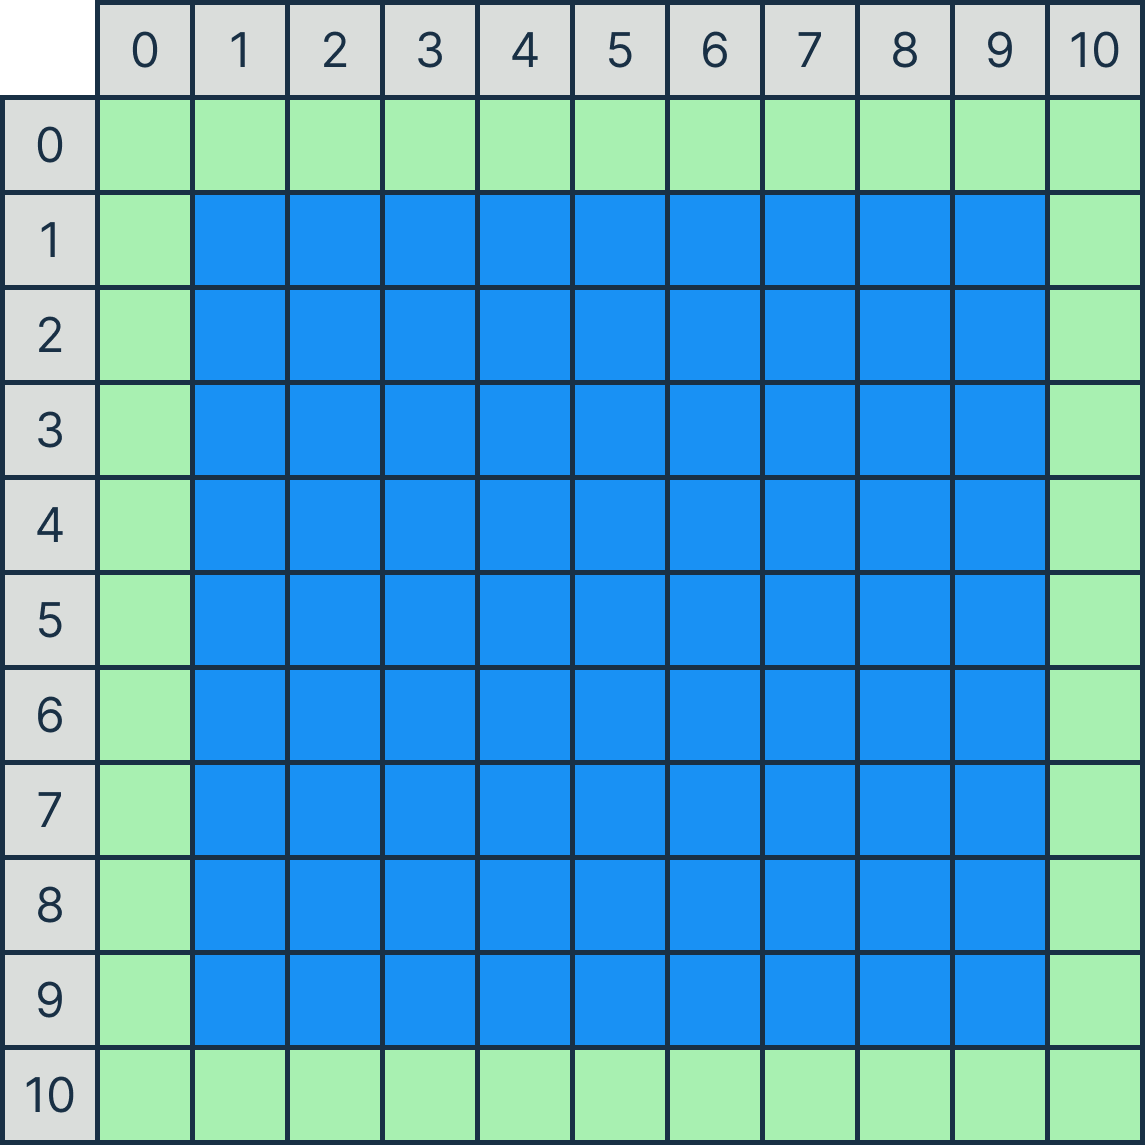
Assumptions / Restrictions / Clarifications
- The count will always be a non-negative integer less than 80.
- The row and column input will always be integer values.
- No two branches will ever get added onto the same position.
Examples
Autotest
You may like to autotest this section with the following command:1511 autotest-stage 01_03 cs_flowersRemember to do your own testing!
Stage 1.4 - Add Bush
Also coincidentally, bushes have also been hurled onto Physics Lawn. Some in a single file, creating small mazes. Stage 1.4 will extend off of Stage 1.3 with an additional foliage that can be added onto the map.
A bushes are 1 x length tiles. The start_row/start_col values are the starting position, followed by orientation, which indicates the orientation of the bush. Either being h for horizontal or v for vertical. Lastly length tells us how many tiles across from their initial spawn position they stretch.
How many tiles of foliage:[count]u [start_row] [start_col] [orientation] [length]Bush added!u [start_row] [start_col] [orientation] [length]Bush added! ...For bushes, you will need to change the tile type from EMPTY to BUSH. A successful addition will print Bush added!.
Since both branches (stage 1.3) and bushes (stage 1.4) are types of foliage, consider using a unified approach for handling both types of foliage. Additionally, consider splitting up taking input into multiple scanf(...) statements since different types of foliage have a different number of inputs.Error Handling
Similar to previous stages, bushes must be added within a predetermined boundary which are all the non-edge tiles of the map. If the position of the foliage lies outside, then that addition will be skipped (not added) and the program should print out Invalid foliage position!.
Here is a diagram of a bush being added at (5, 1), spanning 5 tiles horizontally across the map and one added at (1, 6), spanning 8 tiles vertically. Bushes are represented on the map as ###.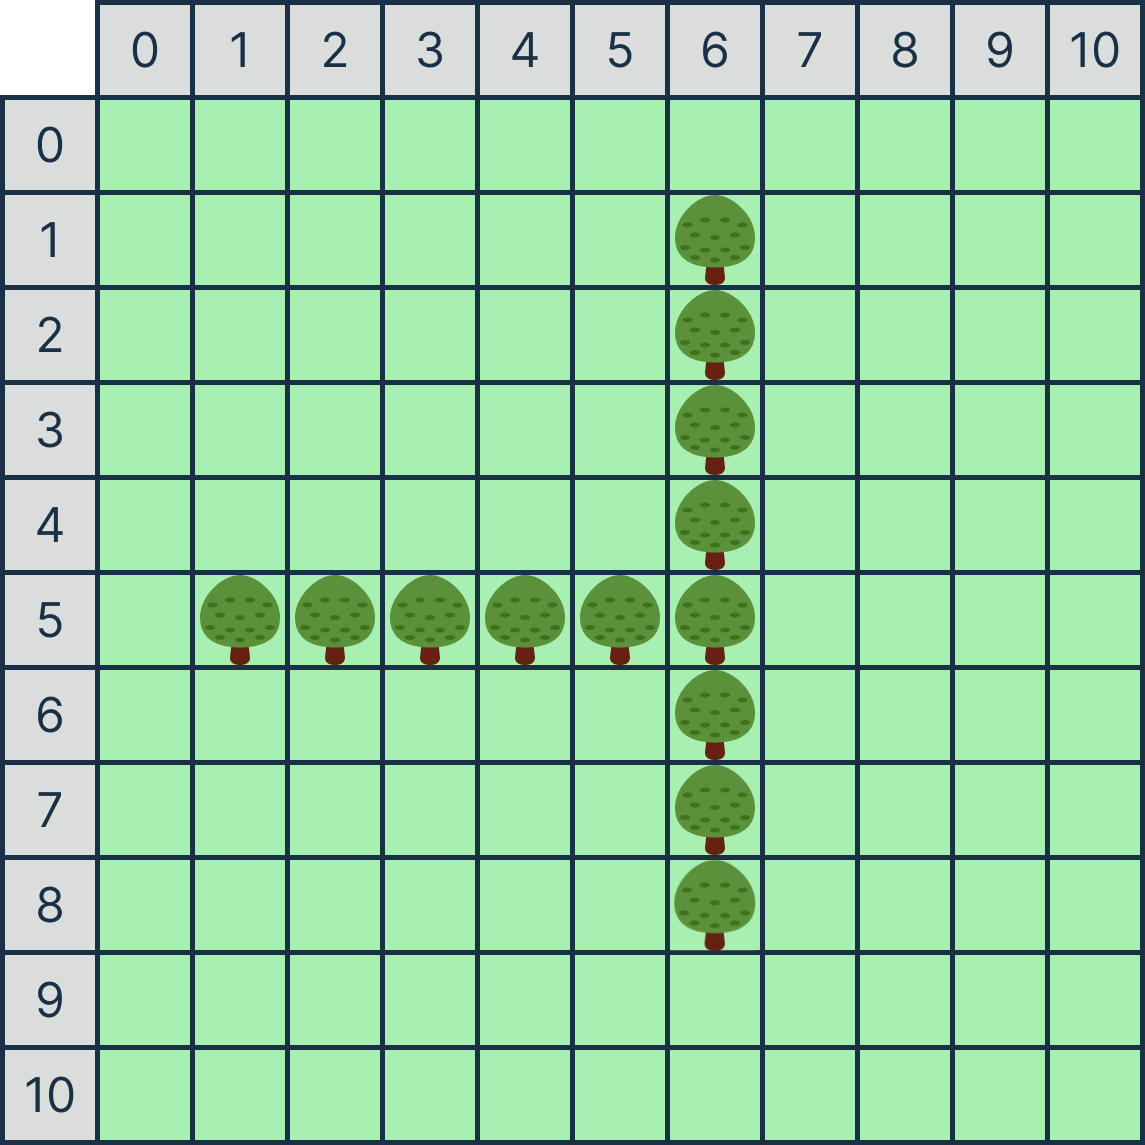
Assumptions / Restrictions / Clarifications
- The start_row/start_column will always be integer values.
- The orientation given will always be either v or h.
- The orientation will always stretch towards the right/bottom of the map.
- The length given will always be a positive integer.
- The length will not cause the bush to exceed the boundary.
- Bushes can intersect each other.
- Branches and bushes will never share the same position.
Examples
Autotest
You may like to autotest this section with the following command:1511 autotest-stage 01_04 cs_flowersRemember to do your own testing!
Testing and Submission
Are you finished with this stage? If so, you should make sure to do the following:
- Run 1511 style, and clean up any issues a human may have reading your code. Don't forget -- 20% of your mark in the assignment is based on style!
- Autotest for this stage of the assignment by running the autotest-stage command as shown below.
- Remember -- give early, and give often. Only your last submission counts, but why not be safe and submit right now?
Assessment
Assignment Conditions
-
Joint work is not permitted on this assignment.
This is an individual assignment.
The work you submit must be entirely your own work. Submission of any work even partly written by any other person is not permitted.
Except, you may use small amounts (< 10 lines) of general purpose code (not specific to the assignment) obtained from a site such as Stack Overflow or other publically available resources. You should attribute clearly the source of this code in an accompanying comment.
Assignment submissions will be examined, both automatically and manually for work written by others.
Do not request help from anyone other than the teaching staff of COMP1511, e.g. in the course forum & help sessions.
Do not post your assignment code to the course forum - the teaching staff can view assignment code you have recently autotested or submitted with give.
Rationale: this assignment is designed to develop the individual skills needed to produce an entire working program. Using code written by or taken from other people will stop you learning these skills. Other CSE courses focus on the skill needed for work in a team.
-
The use of code-synthesis tools, such as GitHub Copilot, is not permitted on this assignment.
Rationale: this assignment is intended to develop your understanding of basic concepts. Using synthesis tools will stop you learning these fundamental concepts.
-
Sharing, publishing, distributing your assignment work is not permitted.
Do not provide or show your assignment work to any other person other than the teaching staff of COMP1511. For example, do not message your work to friends.
Do not publish your assignment code via the internet. For example, do not place your assignment in a public GitHub repository.
Rationale: by publishing or sharing your work you are facilitating other students using your work which is not permitted. If they submit your work, you may become involved in an academic integrity investigation.
-
Sharing, publishing, distributing your assignment work after the completion of COMP1511 is not permitted.
For example, do not place your assignment in a public GitHub repository after COMP1511 is over.
Rationale: COMP1511 sometimes reuses assignment themes using similar concepts and content. Students in future terms find your code and use it which is not permitted and you may become involved in an academic integrity investigation.
Violation of the above conditions may result in an academic integrity investigation with possible penalties, up to and including a mark of 0 in COMP1511 and exclusion from UNSW.
Relevant scholarship authorities will be informed if students holding scholarships are involved in an incident of plagiarism or other misconduct. If you knowingly provide or show your assignment work to another person for any reason, and work derived from it is submitted you may be penalised, even if the work was submitted without your knowledge or consent. This may apply even if your work is submitted by a third party unknown to you.
Note, you will not be penalised if your work is taken without your consent or knowledge.
For more information, read the UNSW Student Code, or contact the course account. The following penalties apply to your total mark for plagiarism:
| 0 for the assignment | Knowingly providing your work to anyone and it is subsequently submitted (by anyone). |
| 0 for the assignment | Submitting any other person's work. This includes joint work. |
| 0 FL for COMP1511 | Paying another person to complete work. Submitting another person's work without their consent. |
Submission of Work
You should submit intermediate versions of your assignment. Every time you autotest or submit, a copy will be saved as a backup. You can find those backups here, by logging in, and choosing the yellow button next to 'cs_flowers.c'.
Every time you work on the assignment and make some progress you should copy your work to your CSE account and submit it using the give command below.
It is fine if intermediate versions do not compile or otherwise fail submission tests.
Only the final submitted version of your assignment will be marked.
You submit your work like this:
give cs1511 ass1_cs_flowers cs_flowers.cAssessment Scheme
This assignment will contribute 20% to your final mark.
80% of the marks for this assignment will be based on the performance of the code you write in cs_flowers.c
20% of the marks for this assignment will come from manual marking of the readability of the C you have written. The manual marking will involve checking your code for clarity, and readability, which includes the use of functions and efficient use of loops and if statements.
Marks for your performance will be allocated roughly according to the below scheme.
| 100% for Performance | Completely Working Implementation, which exactly follows the spec (Stage 1, 2, 3 and 4). |
| 85% for Performance | Completely working implementation of Stage 1, 2 and 3. |
| 65% for Performance | Completely working implementation of Stage 1 and Stage 2. |
| 35% for Performance | Completely working implementation of Stage 1. |
The Challenge stage of the assignment is NOT worth any marks, but is something fun for you to work on getting to know a new library and building something more visual!
Style Marking Rubric
| 0 | 1 | 2 | 3 | 4 | |
| Formatting (/5) | |||||
| Indentation (/2) - Should use a consistent indentation scheme. | Multiple instances throughout code of inconsistent/bad indentation | Code is mostly correctly indented | Code is consistently indented throughout the program | ||
| Whitespace (/1) - Should use consistent whitespace (for example, 3 + 3 not 3+ 3) | Many whitespace errors | No whitespace errors | |||
| Vertical Whitespace (/1) - Should use consistent whitespace (for example, vertical whitespace between sections of code) | Code has no consideration for use of vertical whitespace | Code consistently uses reasonable vertical whitespace | |||
| Line Length (/1) - Lines should be max. 80 characters long | Many lines over 80 characters | No lines over 80 characters | |||
| Documentation (/5) | |||||
| Comments (incl. header comment) (/3) - Comments have been used throughout the code above code sections and functions to explain their purpose. A header comment (with name, zID and a program description) has been included | No comments provided throughout code | Few comments provided throughout code | Comments are provided as needed, but some details or explanations may be missing causing the code to be difficult to follow | Comments have been used throughout the code above code sections and functions to explain their purpose. A header comment (with name, zID and a program description) has been included | |
| Function/variable/constant naming (/2) - Functions/variables/constants names all follow naming conventions in style guide and help in understanding the code | Functions/variables/constants names do not follow naming conventions in style guide and help in understanding the code | Functions/variables/constants names somewhat follow naming conventions in style guide and help in understanding the code | Functions/variables/constants names all follow naming conventions in style guide and help in understanding the code | ||
| Organisation (/5) | |||||
| Function Usage (/4) - Code has been decomposed into appropriate functions separating functionalities | No functions are present, code is one main function | Some functions are present, but functions are all more than 50 lines | Some functions are present, and all functions are approximately 50 lines long | Most code has been moved to sensible/thoought out functions, but they are mostly more than 50 lines (incl. main function) | All code has been meaningfully decomposed into functions of approx 50 lines (incl. main function) |
| Function Prototypes (/1) - Function Prototypes have been used to declare functions above main | Functions are used but have not been prototyped | All functions have a prototype above the main function or no functions are used | |||
| Elegance (/5) | |||||
| Overdeep nesting (/2) - You should not have too many levels of nesting in your code (nesting which is 5 or more levels deep) | Many instances of overdeep nesting | <= 3 instances of overdeep nesting | No instances of overdeep nesting | ||
| Code Repetition (/2) - Potential repetition of code has been dealt with via the use of functions or loops | Many instances of repeated code sections | <= 3 instances of repeated code sections | Potential repetition of code has been dealt with via the use of functions or loops | ||
| Constant Usage (/1) - Any magic numbers are #defined | None of the constants used throughout program are #defined | All constants used are #defined and are used consistently in the code | |||
| Illegal elements | |||||
| Illegal elements - Presence of illegal elements including: Global Variables, Static Variables, Labels or Goto Statements | CAP MARK AT 16/20 | ||||
Due Date
This assignment is due 25 March 2024 20:00:00. For each day after that time, the maximum mark it can achieve will be reduced by 5% (off the ceiling).- For instance, at 1 day past the due date, the maximum mark you can get is 95%.
- For instance, at 3 days past the due date, the maximum mark you can get is 85%.
- For instance, at 5 days past the due date, the maximum mark you can get is 75%. No submissions will be accepted after 5 days late, unless you have special provisions in place.
- Assignment Released
- Fixed autotests not working for Stage 2.2 onwards
- Fixed ordering in stage 3.2
- Fixed spelling/visual errors for Stages 1,3,4
- Amend Stage 3.2 explanation regarding implementation
- Added clarification for Stage 3.3
- Fix typo for Stage 3.3
- Adjusted explanation for Stage 3.3 regarding multiple flowers attacking
- Fix reference bug in Stage 4.1 where nurtured flowers had more root attacks than expected
- Added clarification for Stage 4.1 regarding edge case
- Fix reference bug in Stage 4.2 where the energetic flower spawned in the wrong corner
- Adjusted explanation for Stage 3.3 regarding attacking an eliminated player
- Adjusted explanation for Stage 3.2 to clarify when a flower can perform a defend action
- Added assumption in Stage 4.1 regarding multiple anxious flowers
- Fixed assumption in Stage 4.2 regarding spawning on a root tile
Change Log
Version 1.0(2024-03-04 13:00)
(2024-03-04 21:50)
(2024-03-06 13:00)
(2024-03-07 01:50)
(2024-03-07 01:50)
(2024-03-08 15:00)
(2024-03-08 18:00)
(2024-03-14 14:00)
(2024-03-14 16:00)
(2024-03-15 14:00)
(2024-03-15 14:00)