Assignment #4
CSCI 201 Fall 2023
4.0% of Course Grade
Title
JoesTable
Topics Covered
HTML/CSS
Databases/JDBC/SQL
Java Servlets
AJAX
Introduction
Just in time! Magnificent job with the successful launch of the JoesTable driver scheduling system, and as a result you have received special blessings from the director. “ Perhaps it’s time to do something more modern?” Honestly, it’s not such a bad idea given the amount of success you’ve had. Don’t resist the modern call of duty - embrace it.
This time around, the Council of SAL is looking to expand their product line and make their new product more up-to-date and user-friendly.
Overview
In this assignment, you will be making a web application that builds on the Yelp API from the previous homework assignment. The program will allow users to search for restaurants, add them to their list of favorite restaurants, and schedule reservations for these restaurants.
This means that you’ll need to implement a database to keep track of user information as well as use a variety of different APIs.
The rest of this document includes mockups of the web pages. Your web pages should look reasonably similar in style to the examples shown in the figures. For example, we may not penalize you if the margins are off by 5px, but there will be deductions if an image is
misaligned or half the size it should be. We’ve also provided the sample assets here:
https://drive.google.com/drive/folders/1T6zVhCP88TzsWNhS8Eo_Wq5ijgUunzao?usp=shari ng
Google Maps API
When querying a search, users will have to type in the latitude and longitude, or instead use the Google Maps API to generate a map overview that can populate coordinates. An
example of this is shown in Figure 2. You can learn more about the API here:
https://developers.google.com/maps/documentation/javascript/tutorial.
Please keep in mind that you may have to generate API keys for the Google-affiliated APIs, so do not start this assignment on the last day!
MySQL
In this assignment, you will also need to track user information. You should construct a
simple MySQL database that stores usernames, passwords, emails, favorite restaurants,
reservations, etc. for each user. You will need to display this data on the Favorites page and Reservations page, as shown in Figure 8 and Figure 9.
Note - You have the freedom to design your own database schema. You only need to submit a MySQL script that will help in reproducing your schema.
Home Page

Figure 1. Home page (landing page)
This is the landing page for your web assignment. Users can run a search by entering a
restaurant name and coordinates, selecting the order of the search results (using the radio buttons), and then clicking on the magnifying glass icon. The user can also use the Google Maps button to open a Google Maps overlay, shown in Figure 4, and select a location from the map for the coordinates. A successful search leads the user to the Search Results
page, as shown in Figure 2. More details are provided in the following sections.

Figure 2. Search Results Page (without user login)
On clicking the image, additional details about the restaurant are displayed as shown in Figure 3. More details are provided in the following sections. Clicking on the image now redirects the user to the Yelp page of the restaurant.

Figure 3. Details Page (without user login)
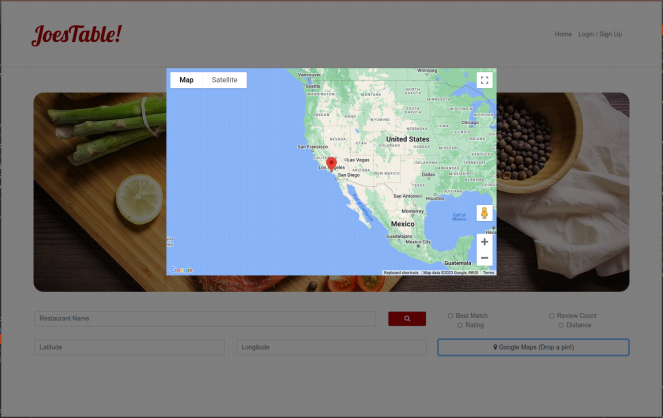
Figure 4. Home page (Google Maps overlay)
The user arrives at this page after clicking on the Google Maps button from Figure 1. The user can click any location on the map, and doing so will populate the latitude and longitude fields with the latitude and longitude of the selected location. For example, if the user clicks on the Los Angeles area, the latitude and longitude could be populated with 34.02116 and -118.287132 respectively.
Users can use the top menu bar to navigate between the Home Page by clicking on “ Home,” and the Login / Signup page by clicking on “ Login / Sign Up.” If the user is already logged in, the menu bar should instead contain “ Home,” “ Favorites” , “ Reservations” and “ Logout.” This menu bar should persist between all pages of this application.
Clicking on the logo (JoesTable!) should redirect the user to the Home page as well. This should apply to all the pages in this assignment.
Login/Signup Page
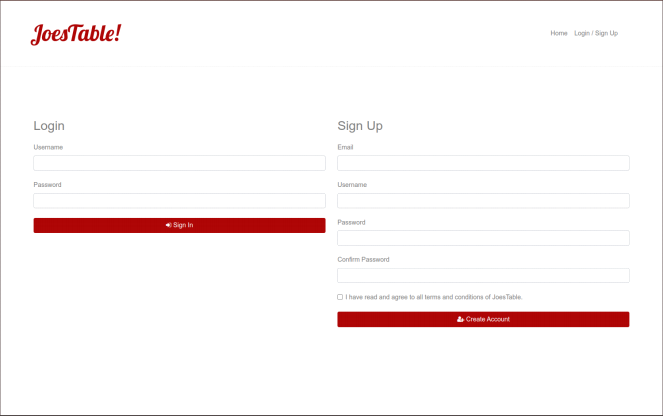
Figure 5. Login/Signup page
Users can sign up for a new account, or login with a pre-existing account on this page.
When signing up, the user will enter their information in the required fields (be sure to
display an appropriate error message if there are missing or improperly formatted fields). Upon a successful sign up, the user should automatically be logged in and redirect back to the Home page (Figure 6).
Here are some possible errors to check for:
● Data is missing
● Data is malformed (i.e., Email does not contain an @ or does not contain anything after @ (no domain), etc.)
● There is already an account associated with the Email
On the other hand, users can choose to login with their login credentials. Again, errors should be displayed appropriately upon missing or improperly formatted fields. Upon a successful login, the user is redirected back to the Home page (Figure 6).

Figure 6. Home Page (after user login)
Search Results Page

Figure 7. Search Results page (for logged in user)
The user arrives at this page after a successful query from the Home Page (for logged in users). Using the information from the Yelp API, your program should display the 10 best results based on the search query and sorting option. Each row of information contains an image related to the restaurant, the restaurant name, the restaurant address, and a link to their Yelp page. Clicking on the image redirects the user to the Details page for that restaurant (Figure 8).
Details Page
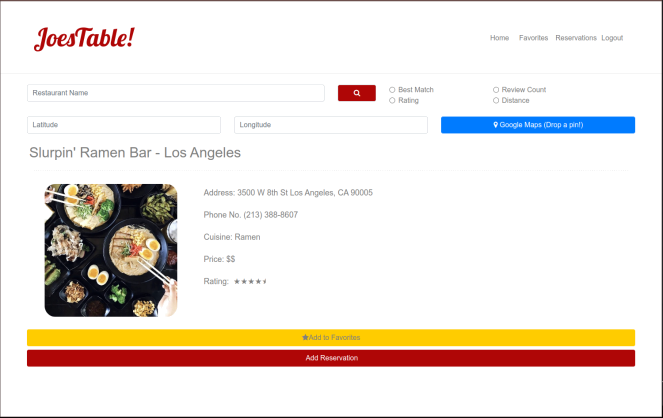
Figure 8. Details page (logged in user)
This Details page contains additional details about the restaurant that was selected from the Search Results page. This page should contain the restaurant name, address, same image from the Search Results page, phone number, cuisine type, price (in dollar signs), as well as star rating. Clicking on the image now redirects the user to the Yelp page of the restaurant.
Additionally, underneath the image should be two buttons: “Add to Favorites” and “Add
Reservation.” The former button will display either “Add to Favorites” or “ Remove from
Favorites” depending on whether the restaurant is already in the user’s favorite restaurants list or not. Once the button is clicked and the restaurant is added to the favorite restaurants list, the text and functionality should change without needing to refresh the entire webpage.

Figure 9. Details page (Add Reservation form)
Clicking on the “Add Reservation” button, appropriate text fields should display underneath the button without needing to refresh the entire webpage. The user can select a date on the calendar, select or enter in a time as well as enter any additional notes for the reservation. If any of the fields are missing information, be sure to print out the appropriate error message. The reservation is added to the reservation list when they click on the “Submit Reservation” button.
On clicking Date, a calendar should pop up for date selection and on clicking Time, the time picker should pop up. This functionality can be achieved using HTML5 Date and Time input type.
HTML5 Date and Time
When making reservations users have to enter the date and time of reservation. You should use the HTML5 Date and Time input types. Below is sample HTML code to create date and time fields in your reservation form (you might have to modify it to suit your needs):
For Date:
For Time:
Favorites Page
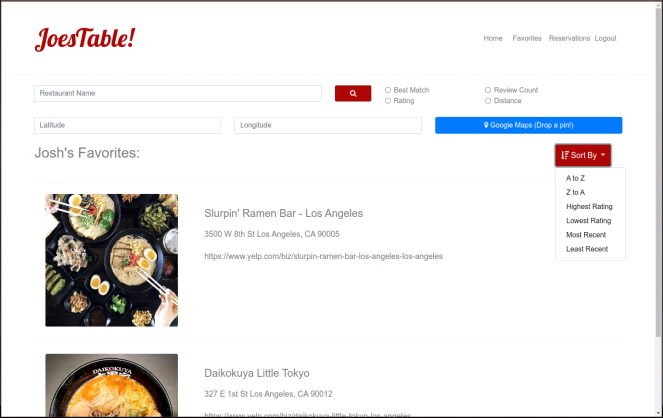
Figure 10. Favorites Page
The user can access their Favorites page using the menu bar at the top of each page. The favorite restaurants are displayed chronologically (most recent first) by default, but the user can change the sorting order by using the “Sort by” dropdown menu on the page. Selecting a new sort order should reorder the favorite restaurants list without needing to refresh the entire page.
Alphabetical order (A to Z or Z to A) is based on the name of the restaurant; Rating is based on the star rating of the restaurant, and Recent is based on the time the restaurant was added to the favorite restaurants list. The user should also be able to navigate to the Details page (Figure 8) of the restaurant by clicking on the image associated with that restaurant.
Reservations Page
The users can view their reservations by accessing the Reservations page using the menu bar at the top of each page. The reservations are displayed in ascending order by date and time (most recent first) by default, but the user can change the sorting order by using the
“Sort by” dropdown menu on the page. Reservations can be sorted by date and time. “Sort by Least Recent” would sort them in descending order of date and time. “Sort by Most
Recent” would sort them in ascending order of date and time.
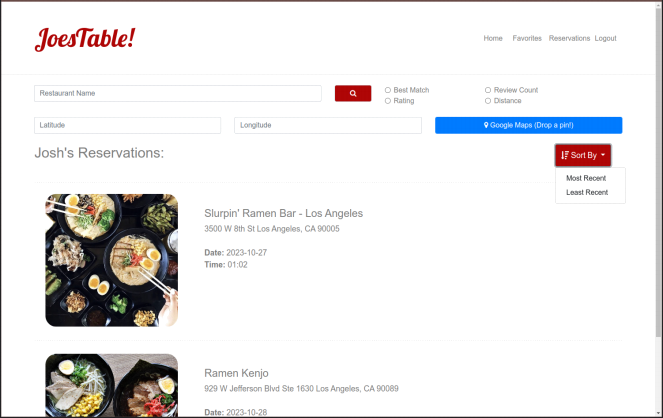
Figure 11. Reservations Page
Important notes:
1. In the event that any mysql-related class or any other externally added JAR class is not included in the Eclipse Export ZIP file, despite being included in the classpath, the web content of the project will be unable to access the JAR file.
To enable web content to locate the JAR file, it is imperative that the JAR file be placed in the classpath and also be placed within the web app/WEB-INF folder, specifically inside a directory named lib. See the lecture notes.
If the lib folder has not been automatically generated by Eclipse, you should
manually create the lib folder within the web app/WEB-INF directory and proceed to add the necessary JAR files to the web app/WEB-INF/lib folder.
In earlier versions of Eclipse, WebContent was used instead of webapp.
2. To properly access the JDBC Connector from your servlet, and start a connection with MySQL, include the following code:
Class.forName ("com.mysql.cj.jdbc.Driver");
DriverManager.getConnection("jdbc:mysql://localhost/database?user=use
rname&password=password");
(note that Class.forName (“com.mysql.jdbc.Driver”); is deprecated)
SQL Script Submission
You should include a SQL file, named create.sql, that contains the SQL statements to create your database, and place it at the top of your project folder, and ensure that it is
included in the Eclipse Export ZIP file.
Dataflow between Browser - Server - Database
This section describes the flow of data between a browser (client), a Tomcat web server, a Java Servlet, and a MySQL database when using AJAX `fetch()` to retrieve data in JSON format.
This is the process, step by step:
1. Browser (Client):
- The client, typically a web browser, initiates an AJAX request using the `fetch()` JavaScript API.
- The request is made to a specific URL on the Tomcat web server, which is hosting the Java Servlet. The URL may look like: `http://localhost:8080/YourWebApp/YourServlet`.
2. Tomcat Web Server:
- The Tomcat web server listens for incoming HTTP requests.
- When it receives the request, it maps the URL to the appropriate servlet based on the servlet mapping defined in the `web.xml` or annotations (if using Servlet 3.0+).
3. Java Servlet:
- The servlet receives the HTTP request.
- It processes the request by extracting any query parameters or data sent in the request (e.g., query string parameters, request body data).
- The servlet interacts with the MySQL database using JDBC. It sends a SQL query to the database to retrieve the requested data.
4. MySQL Database:
- The MySQL database receives the SQL query from the servlet.
- It processes the query and retrieves the data from the database tables.
- The result set is typically returned as a set of rows and columns.
5. Java Servlet (Continued):
- The servlet receives the data from the database and formats it into a JSON response.
- It sets the appropriate HTTP response headers to indicate that the response is in JSON format.
- The servlet sends the JSON response back to the client as part of the HTTP response body.
6. Browser (Client) - AJAX Response Handling:
- The browser receives the JSON response from the server.
- The client-side JavaScript code in the browser can then parse and process the JSON data.
- The data can be used to dynamically update the web page, display results, or perform other actions as required by the web application.
Grading Criteria
Your web project should match the screenshots as closely as possible. The maximum number of points earned is 6.
Home Page (1.0)
0.5 Home Page looks like the screenshot
0.3 Google Maps displays properly and is functional
0.2 All input fields are functional
Login/Signup Page (1.3)
0.5 Login Page looks like the screenshot
0.2 Login / Signup is functional (data stored and retrieved from database)
0.3 Text field errors are caught appropriately
0.3 All input fields are functional
Search Results Page (1.2)
0.5 Search Results Page looks like the screenshot
0.4 Returned data is accurate for each of the different radio button options
0.3 Links redirect properly when clicked on
Details Page (1.5)
0.5 Details Page looks like the screenshot
0.2 Clicking on the image redirects to the appropriate Yelp page
0.3 Add to Favorites/Remove from Favorites is functional
0.5 HTML5 Calendar and TimePicker displays properly and is functional
Favorites Page (0.6)
0.2 Favorites Page looks like the screenshot
0.2 Each sorting methodology is functional
0.1 Clicking on the image redirects appropriately
Reservations Page (0.4)
0.2 Reservations Page looks like the screenshot
0.2 Each sorting by more recent date is functional
0.1 Clicking on the image redirects appropriately
Important note: using JSP instead of Ajax/JSON will result in a 2-point penalty.