Hello, if you have any need, please feel free to consult us, this is my wechat: wx91due
Assignment 6: Audio Processing with Audacity
1. Introduction
In this assignment you will use Audacity, a free and open-source computer application, to record and process digital audio. This exercise will help you better understand digital audio creation, compression, storage, and subjective quality assessments.
1.1. Downloading and installing Audacity (v3.7.1 or greater)
You must use Audacity for this assignment. Download the installation file from https://www.audacityteam.org/download/.
Note: You do not have to sign up with the Muse Hub or Audacity’s cloud saving platform to download and install Audacity. In fact, select the second (less recommended 64-bit installer) download option in Figure 1 to avoid installing the Muse Hub.
Double-click the downloaded file and follow prompts to install it (and other dependencies) on your computer.
The YouTube channel https://www.youtube.com/watch?v=yzJ2VyYkmaA is a good Audacity tutorial. Launch Audacity after the installation completes.
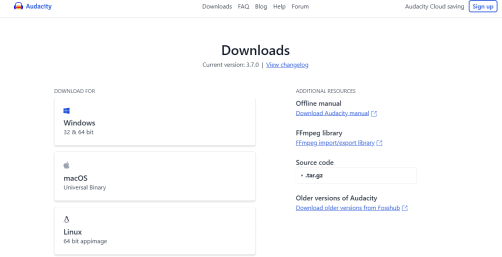
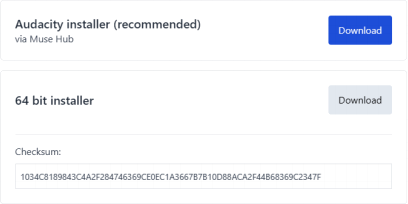
Figure 1: Download pages for Audacity at https://www.audacityteam.org/download
1.2. System requirements
Your computer should have an inbuilt or external microphone and speakers with a suitable audio driver. Check system requirements by doing the following (see Figure 2): Click on Audio Setup in the top tool ribbon, then Audio Settings. In Audio Settings dialogue, check that at least one option is available for Host (audio driver), Playback device (speakers) and Recording device (mic). There should either be one (mono) or two (stereo) recording channels available on your device.
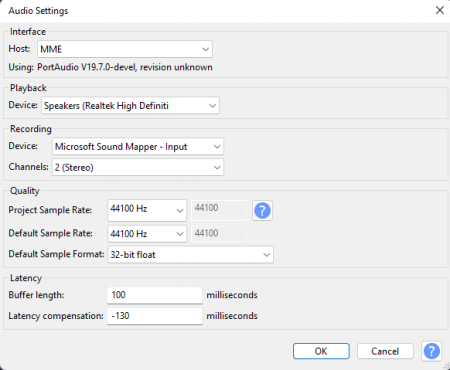
Figure 2: Audio Settings Dialogue: Screenshots were taken from a Windows PC. The MAC interface is very similar. Host drivers, Playback, available channels and Recording devices will differ among computers.
1.3. Academic Honesty
Students are required to do and submit their own work and follow York University’s policy on academic honesty very strictly.
2. Assignment Tasks
The following tasks describe steps in recording, exporting, and analysing short audio clips. By doing them you will better understand concepts of digital audio creation (e.g., sampling and encoding), compression, and subjective quality assessment.
2.1. Creating and exporting audio clips
Step 1: Launch Audacity and inspect the user interface. The sampling rate or frequency (referred to as Project Sample Rate) used to digitize audio can be chosen from Audio Settings dialogue shown in Figure 2. Set the Project Sampling Rate to 44100 Hz (44.1 kHz) then click OK to register the selection and close the dialogue.
Step 2: Record a 20 – 25 s audio clip of you reading a short piece of text from any source (e.g., the internet, your essay, lecture slides, etc.), or singing a short piece of music. Make sure your recordings are free from background noise like other voices, music, and other types of interference. Clips should not be shorter than 20 s or longer than 25 s. Start recording by clicking on the record button (•) in the tools ribbon. Stop recording by clicking the stop button (.) in the ribbon. You are not required to cite the source of your content.
Step 3: Inspect the fluctuating amplitude of your voice captured as discrete mono or stereo channel values over time. Use the controls in the tools ribbon to play back the recording. If you wish to do another recording, select the whole waveform, press delete to erase the current recording, then start the recording process over.
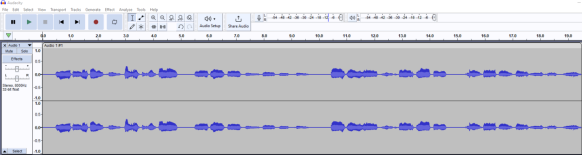
Figure 3: A example 2-channel (stereo) voice waveform - digital speech samples plotted over time
Step 4: When you are satisfied with the recording, select and save it by going to Select -> All, then going to File -> Export Audio -> Export to your preferred destination. Make the following settings in the Export Audio dialogue box:
• Export Range = Current selection
• Format = WAV (Microsoft)
• Channels = Mono
• Sample Rate = 8000 Hz (original 44.1 kHz recording will be resampled to 8 kHz)
• Encoding = Unsigned 8-bit PCM (PCM means Pulse-Code Modulation).
• Folder: choose a suitable storage location (folder) for the audio file
• File Name: name your files in the format FirstNameX_Dbits_FkHz. Where FirstName is your first name, X is the initial of your last name, D is the bit depth per digital sample (D = 8 for the current selection), and F is the sampling frequency in kHz (F = 8 for the current selection.
Next, export the same recording using a bit depth of 16 bits by setting the Encoding to Signed 16-bit PCM and name the file in the given format. These WAVE files being created contain uncompressed digital audio.
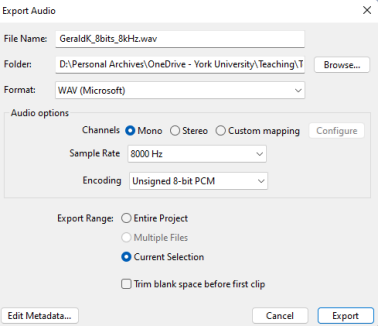
Figure 4: Export Audio dialogue showing required audio encoding settings
Step 5: Keeping the original recording (44.1-kHz-sampled) open throughout, repeat step 4 for sampling frequencies 11.025, 16 kHz and bit depths of 8 and 16 bits. You should produce 6 WAV files with each file sampled with sampling frequencies 8, 11.025, 16 kHz, and encoded with 8- and 16-bit depths respectively. Remember to make appropriate selections for Channel, Sample Rate and Encoding to obtain the required audio samples and name the audio files accordingly.
2.2. Subjective quality assessment
Step 6: Delete the current selection from the user interface. Load each file inside Audacity1 by choosing File -> Open -> Select one of more files dialogue. Play each and rank the perceived quality of all 6 clips. You may use headphones/earphones to get the best aural perception. Open a new Word document, construct a table like Table I and provide details for all six audio clips in respective cells as shown.
Table I: Subjective quality assessment for
|
Filename |
Size (kB)4 |
Sampling freq. (kHz) |
Per channel bit depth |
Per channel bit rate (kbps) |
Subjective quality rank2 |
Comment3 |
|
GeraldK_8bits_8kHz.wav |
185 |
8 |
8 |
64 |
4 |
1-sentence maximum description of what you hear |
|
GeraldK_16bits_11.025kHz.wav |
508 |
11.025 |
16 |
176.4 |
1 |
1-sentence maximum description of what you hear |
1 Use only Audacity to play back audio clips. Other audio player apps may add undesirable effects or equalization to the recordings.
2Subjective quality ranks should be numbers 1 through 6; rank 1 being the clip with the best perceived quality and rank 6 being the clip with the worst perceived quality.
3Comment on things like perceived noise, quality of consonants, richness of sound etc.
4 Record File Size, not Size on Disk reported by your computer system. If needed, use the decimal (10x) rather than binary (2x) conversion factor.
Step 7: Provide answers to the following questions in the Word document:
1. Mention 2 factors (maximum 3 words for each) that influenced the quality of recorded audio.
2. Mention 2 factors (maximum 3 words for each) that affected the recorded file sizes.
3. Calculate the expected uncompressed file size in kilobytes of a 2-channel, 20-second audio. recording sampled at 88 kHz and encoded with 16 bits per sample. Show your working. If needed, use the decimal (10x) conversion factor.
2.3 Audio Compression
Step 8: Open the 16 kHz, 16-bit per sample clip and export it (File -> Export Audio -> Choose storage -> Select MP3/FLAC format ) into compressed MP3 and FLAC files. For MP3, leave the Sample Rate (16 kHz), Bit Rate Mode, Quality and Channels as default settings (Figure 5a). For FLAC leave the Sample Rate, Level and Bit Depth as default (Figure 5b). Give each file the same name as the original uncompressed file. Check the file sizes, calculate their compression ratios and enter the values into a second table in the Word document. An example is given in Table II below:

(a) MP3 export settings
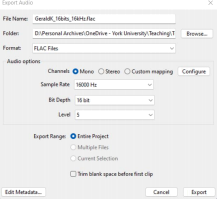
(b) FLAC export settings
Figure 5: Settings for MP3 and FLAC exports
Table II: Compressed audiofile summaries
|
Filename |
File size (kB) |
Compression ratio (%) |
|
GeraldK_16bits_16kHz.wav |
736 |
-- |
|
GeraldK_16bits_16kHz.mp3 |
55 |
7.5 |
|
GeraldK_16bits_16kHz.flac |
426 |
57.9 |
3. Requirements and Submissions
Complete all tasks 1-8 and submit the following four (4) files on EClass.
1. Word/pdf document with:
• Your completed version of Table I
• Answers to questions 1, 2, and 3 (show your working in 3)
• Your completed version of Table II. Note that values in Table I and II will differ significantly from examples given in this manual.
Name the document FirstnameX_Assessment. A sample of the completed document is shown in Figure 6
2. The following audio clips
• FirstnameX_16bits_16kHz.wav
• FirstnameX_16bits_16kHz.mp3
• FirstnameX_16bits_16kHz.flac
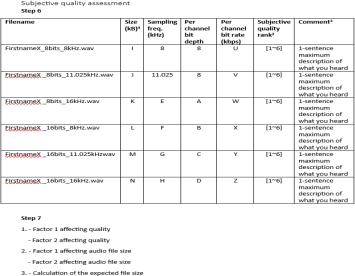
Figure 6: Sample of the required Word/pdf document